
In this blog article, I will provide you will a simple kombucha scoby guide. You’ll learn how to grow and sustain scoby, so that you can make batch after batch of your very own kombucha!

Why make a kombucha SCOBY from scratch?
If you are anything like me, then you’ll find making your own scoby rewarding. Not only are you fermeting delicious drinks that are nutrient dense and refreshing, you are also making something yourself where you’ll know exactly what is going in to it.
You can also be at peace knowing that you safely handled your kombucha from start to finish.
Lastly, kombucha is pricey, especially if you love kombucha and you are buying it often. So making your own scoby can save you lots of money!
Why I love having my own SCOBY
Not only am I saving money on something that I love to drink, but I can also customize it to my taste! For instance, this past winter I made a really delicious kombucha that was cranberry orange flavored!
What is a SCOBY?
While a scoby tends to look like a mushroom, it is not. However, SCOBY stands for “symbiotic culture of bacteria and yeast.” This special culture of bacteria and yeast is the key ingredient in kombucha.
Find out more about scoby here.

How long does it take to grow a kombucha SCOBY from scratch?
It usually takes around 2-4 weeks depending on the temperature of your home.
Do I need a SCOBY to make kombucha?
Yes, but with a little patience, it is super easy to make one from store bought kombucha.
Is SCOBY edible?
Personally, I’ve never tried scoby before, but it is edible. Some people like to create candy from it or smoothies as well.
How many times can you reuse SCOBY for kombucha?
You can safely reuse a scoby multiple times, about 4-6 batches, or sometimes even more! You’ll be good to go as long as the scoby is healthy.
When the SCOBY is old or unhealthy:
Over time, scoby gets thicker and darker naturally. When this happens, peel off the darker layers on the bottom of the scoby. You can use your hands to do this and the layers should peel apart fairly easily.
However, if you scoby starts to smell bad, not like the natural vinegar smell it normally has, or you start to see mold, you’ll want to discard the scoby and start over again.
What does a healthy kombucha SCOBY look like?
A healthy scoby is typically pale and can be lopsided or uneven looking. They tend to look rubbery too. However, they are not fuzzy, this indicates mold!

Can I use flavored kombucha to grow a kombucha SCOBY?
While plain/unflavored is best, you can use flavored kombucha in a pinch. Just note that your kombucha may end up tasting a little like the flavors of the tea that you used to first make the scoby. However, after a few batches, the flavor should pretty much go away.
Also, be sure to get unpasteurized kombucha! 🙂
What kind of tea should I use to make a kombucha SCOBY?
The best tea to use is black tea like Ceylon or English breakfast.
Why is black tea the best for making SCOBY from scratch?
Black tea is known to be the most nourishing and reliable for growing a strong scoby for the following reasons:
Nitrogen and nutrients: These are what the bacteria and yeast love and need to really thrive and they are abundant in black tea.
Stable pH: Since black tea can provide a slightly acidic environment, the scoby can safely form without harmful microbes.
Great track record: Both experienced home brewers and commercial brewers use black tea because it delivers healthy, strong cultures with minimal issues time and time again.
Can I use green or herbal teas?
Green tea can work well once your scoby is well established, but I’ve never tried it myself.
Herbal teas aren’t recommended because they don’t have the right nutrients to help sustain the brew and can potentially damage the scoby over time.
Can I compost my SCOBY?
Yes, you certainly can! 🙂
Can I use a metal lid, straw, or utensil with my kombucha?
No- avoid metal of any kind because it will react with the acids!
What can I do with extra SCOBYs?
There are a few different things that you can do:
Make a scoby hotel: A scoby hotel is a jar where you keep all of your extra scobys in kombucha when they are not being used. Simply place the scobys in a clean, glass jar and cover them with unflavored kombucha. Secure the top of the jar with a clean cheese cloth or coffee filter and rubber band. Keep it out of direct sunlight and at room temperture. Be sure to top it off with fresh kombucha every few weeks to keep it healthy.
Eat it: Check out this ginger kombucha scoby candy recipe!
Share the scoby with others
Compost it
Equipment needed
Tea kettle or pan to boil water
Wide-mouth glass jar (quart-size)
Funnel for pouring tea into jar (optional)
A clean coffee filter or cheese cloth and a rubber band (to keep debris out of the jar)
Ingredients for making kombucha SCOBY
1 bottle of raw/unpasteurized, store-bought kombucha (flavored will work too, if in a pinch)
1 black tea bag or 1 teaspoon of black tea
1 cup of water
1 tablespoon of white sugar

How to make kombucha SCOBY
Start by brewing the tea bag (or leaves if using) in 1 cup of boiling water. Stir in the tablespoon sugar. Set it aside and let it cool down to room temperature.
Next, pour the cooled sweet tea into the glass jar and add it the store-bought kombucha.
Then, cover the jar with the coffee filter or cheese cloth and the rubber band. Let it sit at room temperature for, out of direct sunlight, for about 2-4 weeks.

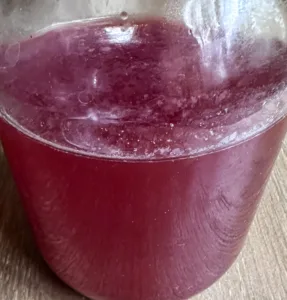
Check on the tea every few days. You’ll start to notice a jelly-like layer slowly form on top. This jelly layer will be your scoby. It may be kind of thin and cloudy at first, but it will thicken over time.


Lastly, your scoby will be ready when it’s about 1/4-1/2 inch thick and its firm. Now it’s ready to use for your first batch of kombucha!*
*Note that the colors in the pictures of the liquid/tea don’t all match. This is because I took pictures of a few different batches. The scoby should look the same though, regardless of the color of the tea that it is in. 🙂

How to store your SCOBY
Store your scoby in a clean jar with enough kombucha to cover the scoby. Keep it at room temp, out of direct sunlight. Cover the jar with a clean cheese cloth or coffee filter and rubber band. Be sure to top it off with fresh kombucha every few weeks.

Troubleshooting tips
“My scoby isn’t forming“- It can take 2-4 weeks for a scoby to form.
“There’s stuff floating in the jar”– If it’s stringy or jelly looking, that’s normal. Even if it’s cloudy/white looking, that’s fine too. If it’s dry or fuzzy and white, blue, or green in color, that could be mold.
“If my scoby looks weird, can I still use it?”– It’s normal for scoby to look a little “weird.” They have layers, brown stringy pieces, bubbles, etc. All of that is normally just fine.

Kombucha Scoby Guide
Equipment
- Tea kettle or pan to boil water
- Wide-mouth glass jar (quart-size)
- Funnel for pouring tea into jar (optional)
- A clean coffee filter or cheese cloth and a rubber band (to keep debris out of the jar)
Ingredients
- 1 bottle of raw/unpasteurized store-bought kombucha (flavored will work too, if in a pinch)
- 1 black tea bag or 1 teaspoon of black tea
- 1 cup of water
- 1 tablespoon of white sugar
Instructions
- Start by brewing the tea bag (or leaves if using) in 1 cup of boiling water. Stir in the tablespoon sugar. Set it aside and let it cool down to room temperature.
- Next, pour the cooled sweet tea into the glass jar and add it the store-bought kombucha.
- Then, cover the jar with the coffee filter or cheese cloth and the rubber band. Let it sit at room temperature for, out of direct sunlight, for about 2-4 weeks.

- Check on the tea every few days. You’ll start to notice a jelly-like layer slowly form on top. This jelly layer will be your scoby. It may be kind of thin and cloudy at first, but it will thicken over time.
- Lastly, your scoby will be ready when it’s about 1/4-1/2 inch thick and its firm. Now it’s ready to use for your first batch of kombucha!*
- *Note that the colors in the pictures of the liquid/tea don’t all match. This is because I took pictures of a few different batches. The scoby should look the same though, regardless of the color of the tea that it is in. 🙂


Notes
What to do with your first batch
The first batch, what you grew the scoby with, will be vinegary. You can use the batch for starter tea for your next batch of kombucha. Or, you could try it as a vinegar for cleaning.

I hope you all can enjoy delicious, bubbly kombucha! Let me know how your kombucha journey is going!!
-Lydia from Blessed Pursuit of Motherhood
I’ve always been too nervous to try this but I think I will!
This is great! I’ve been wanting to do this for a long time. I ferment a lot of my food and drinks, but never got the kombucha going. I love your step-by-step. It is so helpful and easy enough to follow. I’ll save this so to come back to it once I’m ready to go ahead. Thanks for sharing!
Thank you for making this process seem much simpler than what I expected!